Category Archives: SHGIT

The 7 Best Travel Insurance Companies in 2019

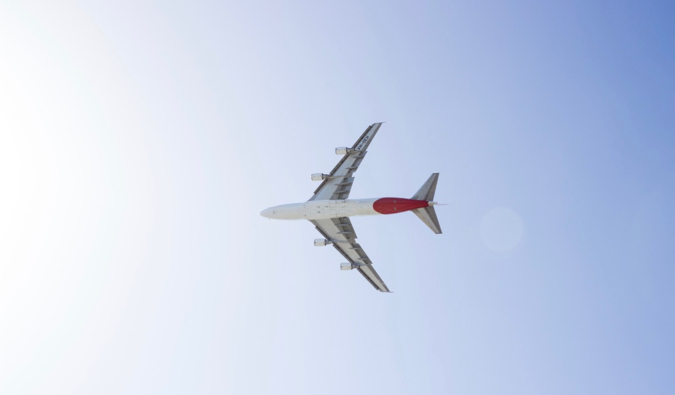
A lone commercial airliner flying over Australia
Posted: 6/17/2019 | June 17th, 2019

Planning a trip can be a lot of fun. Researching amazing bucket list activities, daydreaming about picture-perfect beaches and epic hikes, booking the cheap flights that will take you to the world’s most amazing destinations — it’s the fun part of planning. It gives you ownership of your trip and lets you imagine all the amazing adventures you’ll get into.

What is significantly less fun (yet equally important) is searching for the right travel insurance plan for your trip.

Reading through the fine print, searching out reviews you can trust, picking the best plan — it can all be a little tedious.

And if you’re a new traveler, it can also be a little overwhelming.

There are hundreds of companies out there – all offering the “same” plans. They all have different prices too. Which one is the best? Which review is right?

To help you stay safe during your next trip, I wanted to share my thoughts on the best travel insurance companies on the market. I’ve been backpacking since 2004 and researching companies for a living since 2007. I’ve spent a lot of time reading the fine print (have you ever read NY’s insurance compliance laws? Well, don’t.)

To save you time, I’ve compiled a list of the best travel insurance companies. Whether you’re heading south to escape from work or traveling abroad on a round-the-world trip, this list will help you find a company that works for your trip – and your budget.

Table of Contents

  1. Best overall insurance: World Nomads
  2. Best company for medical evacuation: Medjet
  3. Best company for older travelers: Insure My Trip
  4. Best company for students: STA
  5. Best company for expats: IMGlobal
  6. Best supplemental coverage: Clements
  7. Honorable Mention: Your travel credit card


OUR TOP PICK: World Nomads

I’ve been using World Nomads for the past decade and have never been disappointed. Their plans are comprehensive and great for travelers visiting more than one country in a single trip. It’s easy to read their policies and see what’s covered (and what isn’t), and their customer service is top notch. And if you want to learn more before you purchase or have questions after you sign up, their customer support is there to help.

This company is perfect for adventurous travelers who plan to do things like hiking, kayaking or canoeing, and even some extreme sports like rock climbing bungee jumping. With 100 different activities are covered, World Nomads is the best choice for the active traveler.

Here’s a quick overview:

  • Emergency medical and dental coverage
  • Coverage for trip cancelations, delays, and interruptions
  • Baggage protection
  • Emergency evacuation (for medical emergencies and non-medical emergencies such as natural disasters)
  • Medical transportation
  • 24/7 customer assistance

They are the perfect company if you’re a backpacker or long term traveler. The company was founded by backpackers so they keep people who travel long term in mind in their plans and customer service. This is my go-to insurance company and one I’ve been using for years. If it sounds like the company for you, you can use the widget below to get a quote:

 
(Want to learn more? Check out my comprehensive World Nomads review!)

Medjet

Medjet is the premier membership program for medical transportation. Their extensive plans focus on crisis response and emergency transportation and they have amazing staff on hand to help you through it all.

While many insurance companies will just evacuate you to the nearest hospital in an emergency, MedJet goes above and beyond to ensure that you’re repatriated and not stuck in a foreign medical facility away from your friends and family.

They have both short-term and annual plans, too, so no matter what your travel plans are you’ll be able to find the affordable coverage that you need.

Here’s a quick overview of MedJet:

  • Extensive medical transport coverage
  • Limited time spent in foreign medical facilities
  • Both short-term and annual plans
  • Available for residents of the US, Canada, and Mexico

Medjet is the perfect company for anyone looking to avoid time spent in foreign medical facilities should an emergency or crisis occur.

Insure My Trip

Insure My Trip isn’t actually an insurance company that issues its own plans. Rather, they recommend plans and help you compare prices so you can buy the plan that’s best for you.

With Insure My Trip, you can compare plans from almost 30 different insurance providers. They are the go-to company for senior travelers as well, since many travel insurance companies won’t cover travelers over 65. Insure My Trip provides comparisons from insurance companies that cover older travelers, making them the best option for retirees and other senior adventurers.

Here’s a quick overview of Insure My Trip:

  • Guaranteed low prices
  • Coverage for senior travelers over 65
  • “Anytime advocates” ask the insurer to give your claim a second look if you think it was unfairly denied.
  • Comparisons from 28 different companies to ensure you get the best plan

Insure My Trip is the best choice for older travelers looking for comprehensive coverage over the age of 65.

STA

STA is an online travel agency that is known for its flights and travel packages. But they also sell affordable travel insurance too. STA provides budget-friendly plans for students and teachers, offering coverage for as little as $99 USD for 1 year.

It’s the best choice for anyone studying abroad or teaching overseas. You’ll also get an ISIC card, which includes tons of additional perks and discounts!

Here’s a quick overview of STA Travel Insurance:

  • Budget-friendly plans
  • ISIC card benefits in over 125,000 locations
  • Basic coverage options
  • Great for students/shoestring backpackers.

STA is the best choice for student travelers and teachers working overseas who only need basic travel insurance coverage.

IMGlobal

IMGlobal provides insurance plans that are more akin to your standard US health insurance. They have comprehensive coverage for long-term travelers, plans for non-US citizens, and affordable plans for visitors to the US as well. They have basic plans for students and budget-conscious travelers as well as more robust plans for families and expats.

Their plans cover single trips; however, they also have multi-trip plans for travelers heading out on more than one trip per year.

Here’s a quick overview of IMGlobal:

  • Best for expats and long-term travelers
  • The closest option to normal US health insurance
  • Available for non-US residents
  • 16 different plans to choose from

IMGlobal is the best insurance company for expats and long-term travelers who want coverage beyond medical emergencies.

Clements

Clements focuses on insurance coverage for expats as well as coverage for high-end gear (such as laptops, smartphones, and cameras). Many travel insurance companies only provide minimal coverage for your expensive electronics, which means you’ll have to pay a lot of money out of pocket to replace them should they get lost, damaged, or stolen while you’re abroad. They also offer plans with low or no deductibles so you can rest assured that, should the worst happen, you can replace your valuables without breaking the bank.

Here’s a quick overview of Clements:

  • High-end electronics coverage
  • Low (or no) deductibles
  • Premium plans with unlimited coverage
  • Available both inside and outside of the US

Clements is the best insurance option for anyone traveling with expensive electronics who need comprehensive coverage.

Honorable Mention: Credit Card Coverage

While not the most comprehensive, many travel credit cards will include some degree of travel insurance. Coverage is often limited and might only apply to trips or items purchased with the card. And there may be limited dates of coverage too.

However, something is better than nothing! But while it can be tempting to go for a free insurance plan from your credit card company, their plans are usually not that comprehensive and have minimal coverage and/or limited compensation. These free plans are best used as supplemental coverage in addition to a plan from one of the companies above.

But it’s always great to have options (especially free ones). Be sure to learn more about the best travel credit cards before your next trip (you’ll have to read the fine print).

***

Nobody plans on getting hurt when they travel. And in a perfect world, we wouldn’t. But we all know that this isn’t a perfect world.

My bags were stolen when I was traveling in South Africa.

I popped my eardrum while diving in Thailand.

And I was even stabbed while backpacking in Colombia.

Obviously, I didn’t plan for any of these things to happen.

But they did.

And I was lucky I had travel insurance to help me cover the costs. So before you head out on your next trip, make sure that you’re covered. Invest in your own safety and peace of mind. I promise you, it’s worth the money.

Book Your Trip: Logistical Tips and Tricks

Book Your Flight
Find a cheap flight by using Skyscanner or Momondo. They are my two favorite search engines because they search websites and airlines around the globe so you always know no stone is left unturned.

Book Your Accommodation
You can book your hostel with Hostelworld as they have the largest inventory. If you want to stay somewhere other than a hostel, use Booking.com as they consistently return the cheapest rates for guesthouses and cheap hotels. I use them all the time.

Don’t Forget Travel Insurance
Travel insurance will protect you against illness, injury, theft, and cancellations. It’s comprehensive protection in case anything goes wrong. I never go on a trip without it as I’ve had to use it many times in the past. I’ve been using World Nomads for ten years. My favorite companies that offer the best service and value are:

Looking for the best companies to save money with?
Check out my resource page for the best companies to use when you travel! I list all the ones I use to save money when I travel – and that will save you time and money too!

The post The 7 Best Travel Insurance Companies in 2019 appeared first on Nomadic Matt's Travel Site.
The Best Travel Insurance Companies for Backpackers

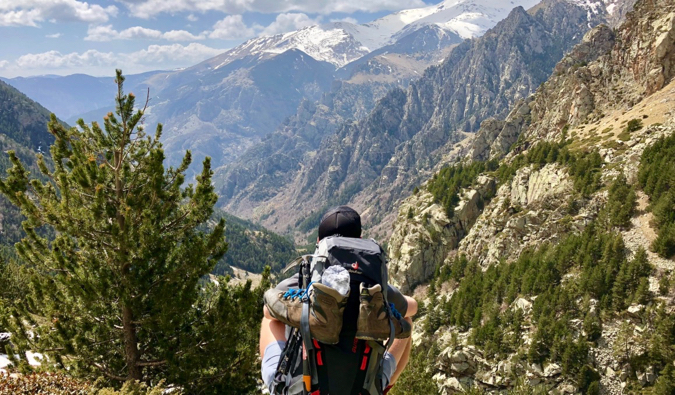
A budget backpacker sitting on a mountain looking into the distance
Posted: 6/16/2019 | June 17th, 2019

I’m a backpacker at heart. Even after traveling the world for over a decade, I still love to travel cheap, prioritizing experiences over fancy accommodation and transportation. I still love staying at hostels, meeting locals, and sampling as many local delicacies as I can.

Contrary to popular belief, being a backpacker is not about pinching every penny — it’s about finding value. If you want to have a genuine and authentic trip without breaking the bank you need to spend your money wisely.

And when it comes to backpacking around the world, one of the wisest choices you can make is to purchase travel insurance.

I know, travel insurance seems like just another expense that will chip away at your budget. I used to think that too.

But it also has the potential to save you thousands of dollars should something go wrong on your trip.

And after traveling around the world for the past 10 years, I can confidently tell you this: things will go wrong.

To help you stay safe on your next trip, here is everything you need to know about buying insurance as a backpacker.

Why Do Backpackers Need Insurance?

The reason you need to buy travel insurance is because accidents happen. Regardless of whether you’re at home or abroad, things go wrong. At home, you likely have access to medical care and reliable medical facilities.

On the road, that isn’t always the case.

While serious injuries are rare, they do happen. And it’s always better to be safe than sorry. But insurance isn’t just for medical emergencies. It also covers a lot of incidents that are much more common than you think!

Here’s a quick overview of what you can expect your backpacker insurance to cover:

  • Medical emergencies (surgery hospitalization fees, medical evacuation)
  • Flight delays and cancellations
  • Trip cancellations (due to injury or a death in the family)
  • Emergency evacuation (due to injury or natural disaster)
  • Dental emergencies
  • Lost or stolen baggage
  • Damaged or stolen gear
  • Death overseas

While it’s unpleasant to spend time dwelling on these things, the truth is, you need to be prepared for the worst. Hopefully, you’ll never need to use your insurance plan, but if you need to, you want to make sure you have the coverage you need.

I’ve had my bags stolen, I’ve needed to go to the hospital overseas, and I was even stabbed while traveling in South America.

I didn’t plan for any of these things to happen, but when they did, I was glad I had insurance to help me get reimbursed as well as to help me navigate the confusion that comes with having an emergency abroad.

I know, as a backpacker you like to keep costs low. Insurance isn’t free, after all, which makes it seem like a burdensome and unnecessary expense.

But it’s much better to pay a few bucks a day than risk losing your life savings should an emergency occur while you don’t have coverage.

What Does Travel Insurance NOT Cover?

While most travel emergencies and injuries are covered by travel insurance, it’s important to know what is not covered by your plan. Knowledge is power, after all.
For reference, most backpacker insurance policies do not cover:

  • Accidents sustained while participating in extreme adventure activities. These often include hang-gliding, paragliding, or bungee jumping.
  • Alcohol- and drug-related incidents.
  • Carelessness or negligence.
  • Pre-existing conditions or general check-ups.
  • Stolen cash (unless you pay for a more comprehensive plan)
  • If civil unrest makes your destination unsafe but your government hasn’t called for an evacuation, you probably won’t qualify for evacuation (unless you have more advanced coverage from a company like Medjet).
  • Changing your mind about your trip or unfriending or breaking up with your travel partner will disqualify you from trip-cancellation coverage.
  • Pre-existing medical conditions don’t qualify for most trip cancellation plans unless otherwise stipulated.
  • If your visa to a destination is refused you won’t be reimbursed if you decide to cancel your trip.

The Best 3 Backpacker Insurance Companies

To help you stay safe on your next trip, here are some suggested companies that provide affordable insurance for backpackers:

1. STA Travel Insurance
STA is an online travel agency that is known for their flights and travel packages — but they offer affordable travel insurance too for students as well.

STA sells basic, budget-friendly coverage for students and teachers who travel, with plans starting as low as $99 USD for 1 year. If you’re a student and a budget backpacker who is only looking for the most basic of coverage, STA is the company for you.

Here’s a quick overview of STA Travel Insurance:

  • Budget-friendly plans
  • ISIC card benefits in over 125,000 locations
  • Basic coverage options
  • Great for students/shoestring backpackers.

Click here to get a quote from STA.

2. Insure My Trip
Insure My Trip helps you compare insurance plans and prices so you can purchase the plan that’s best for you and your budget. You can compare plans from almost 30 different insurance providers, with plenty of budget-friendly options available for backpackers.

And they are the go-to company for older backpackers as well since many travel insurance companies won’t cover travelers over 65. Insure My Trip provides comparisons from insurance companies that cover older travelers, making them the best option for retirees and other senior adventurers.

Here’s a quick overview of Insure My Trip:

  • Guaranteed low prices
  • Coverage for senior travelers over 65
  • “Anytime advocates” ask the insurer to give your claim a second look if you think it was unfairly denied.

Click here to get a quote from Insure My Trip

OUR TOP PICK: World Nomads Travel Insurance
World Nomads is the absolute best insurance company for budget travelers. I’ve been using them for over a decae and have never been disappointed with their customer service or coverage. Their plans are comprehensive and great for both long-term travelers as well as anyone heading out on a shorter vacation. It’s easy to read (and understand) their policies and see what’s covered — and what isn’t.
Best of all, if you want to learn more before you purchase or have questions after you sign up, their customer support is there to help.

World Nomads is perfect for adventurous backpackers who plan to do activities like hiking, kayaking, or even some extreme sports like bungee jumping or rock climbing. With 100 different activities covered, World Nomads is the best choice for the active backpacker.

To help you learn more about World Nomads, here’s a quick overview of their coverage:

  • Emergency medical and dental coverage
  • Coverage for trip cancelations, delays, and interruptions
  • Baggage protection
  • Emergency evacuation (for medical emergencies and non-medical emergencies such as natural disasters)
  • Medical transportation
  • 24/7 customer assistance

World Nomads was founded by backpackers so they know exactly what the budget traveler needs in their plan. This is my go-to insurance company and one I’ve been using for years. If it sounds like the company for you, you can use the widget below to get a quote:

(Want to learn more? Check out my comprehensive World Nomads review!)

***

After backpacking around the world for over a decade, I never leave home without travel insurance. I’ve experienced first-hand how helpful it can be. It’s saved me thousands of dollars over the years — as well as countless headaches too.

Not only that, but buying travel insurance provides peace of mind. It gives you and your family a safety net in case things go wrong. Whether you’re island-hopping in Thailand or getting off the beaten path in Eastern Europe, travel insurance will be there when you need it.

Being a backpacker is all about having amazing, memorable travel experiences all without breaking the bank. And there’s no better way to insulate yourself from expensive (and unnecessary) costs than by buying travel insurance.

Book Your Trip: Logistical Tips and Tricks

Book Your Flight
Find a cheap flight by using Skyscanner or Momondo. They are my two favorite search engines because they search websites and airlines around the globe so you always know no stone is left unturned.

Book Your Accommodation
You can book your hostel with Hostelworld as they have the largest inventory. If you want to stay somewhere other than a hostel, use Booking.com as they consistently return the cheapest rates for guesthouses and cheap hotels. I use them all the time.

Don’t Forget Travel Insurance
Travel insurance will protect you against illness, injury, theft, and cancellations. It’s comprehensive protection in case anything goes wrong. I never go on a trip without it as I’ve had to use it many times in the past. I’ve been using World Nomads for ten years. My favorite companies that offer the best service and value are:

Looking for the best companies to save money with?
Check out my resource page for the best companies to use when you travel! I list all the ones I use to save money when I travel – and that will save you time and money too!

The post The Best Travel Insurance Companies for Backpackers appeared first on Nomadic Matt's Travel Site.
9 Ways to Become a Successful Travel Blogger

blogger blogging successfully
Updated: 12/27/18 | December 27th, 2018

I don’t write articles about how to be successful at blogging often because this is a consumer travel website not a blogging website, but I’ve seen a lot of articles on travel blogging lately, which have many points I disagree with and I think offer a lot bad advice.

As someone who has been blogging for over ten years, I want to offer a counterbalance to some of the prevailing (and wrong) wisdom out there on how to succeed.

(Especially in light of that Instagrammer selling a scam course on how to grow your following!)

Travel blogging is a crowded field — and it gets more crowded by the day. After all, the idea of “getting paid to travel the world” seems like an amazing thing to try to do. You get to visit wonderful places around the world on someone else’s dime!

It’s a dream job, right?

Well, first, running a successful travel blog – or any blog in any industry – is hard work and time-consuming. Putting posts up is not going to result in money falling like rain (though judging by some of the people I’ve seen on paid trips, it can at least amount to a drizzle). You have to work for it.

Blogging takes persistence.

Unless you hit the Internet “viral” lottery, you should expect to plug away for a least a year before you start to see sustainable income coming in.

Building a blog is like building any other business: success takes time, patience, and dedication.

Think of travel blogging like the restaurant business: Just because there are a lot of restaurants doesn’t mean that they are all good or that you shouldn’t open one of your own! Instead, people who open a restaurant or desire to be a world-class chef look around and say, “I can do this better.” That’s the mindset you should have about your travel blog.

Take a look around and go “I can do this better!”

Just because someone can travel and write doesn’t mean they can write well or become a good travel writer. No, most travel blogs are terrible so don’t worry about the number of blogs out there. Worry about the quality of blogs out there.

It’s not a crowded field when you look at it that way.

Here are nine things you can do to succeed in travel blogging (or any blogging field, really) and jump ahead of the crowd. Doing them will make you far more successful than most of the bloggers out there.

1. Read a Lot of Books

I am always shocked at how few travel bloggers develop their skills by reading. Very few read any marketing, strategy, business, or self-development books. Running a blog is like running a business, and if you don’t go to “school” and constantly learn, you’re going to fall behind. Every successful person I know is a voracious reader. They constantly try to improve their skills and knowledge. You must always be a student. You must always learn.

After all, why reinvent the wheel?

Read what experts have to say, learn what works, and apply the tips you pick up to your blog. If someone has been there and done that, why try to learn that through trial and constant error? Read the best way to do it… and do it! I read a lot besides travel books. I consume marketing books, management, writing, history books, and biographies. Even if you only get one idea from the book, that book was worth it. I read at least one book a week and am often reading multiple books at a time. Travel, history, business, fiction — I consume it all.

If you only do one thing from this list, make it this one.

Some of my must-reads are:

If you do only one thing from this list, make reading more it!

2. Be Like Apple — Think Different

Whatever you are going to write about, try to present that subject in a way that hasn’t been done before. If everyone is sharing sponsored content, don’t. If everyone is writing text, make a video. If everyone is serious, be funny. If everyone has complex designs, go simple and visual. If everyone is doing one-off blog posts, create a story through a series of posts that keep people coming back for more.

Always innovate — do something different and unique.

One thing we do here that makes us different is that we put (what I think) a level of detail into our posts that no one else does. We make our posts the ultimate guides on destinations. We add photos, charts, and maps when we can. We add video. Contact information. We want you to come here over and over again because our resources are the best. Many bloggers just provide a light dusting of information. We go deep.

3. Invest in Your Blog

For a long time, I avoided spending any money on this website. I bootstrapped everything and viewed every expense negatively. “That designer would be nice but I can’t afford it. I’ll just create a crappier design myself.”

But I soon realized money spent wisely is an investment.

Now I pay for designers, SEO auditors, conferences, video and audio editors, copy editors, and much more. This allows me to improve the reader experience, develop useful products, work on other projects, and free up time to write. I focus on my core competencies and hire the rest out.

It’s easy to say, “Oh, that conference is too much. I don’t want to spend that much.” But if that conference results in one strong business connection that leads to new sales or a guest posting opportunity, then the conference is worth it. (See below for some good conferences to attend.)

Businesses invest in themselves — and you need to do the same.

It can be easy for me to say now, but even when you start, spending a little bit of money can go a long way. I didn’t start out hiring lots of people. I hired one person, then another, then another. Even if you spend a few hundred dollars on snazzier banners, that can go a long way to improving your readers’ experience.

4. Be Niche

Back when I started blogging in 2008, it was easy to maintain a general budget travel website. You could cover a wide range of travel topics and face little competition. There was only a handful of bloggers. Now, there are too many long-established blogs and websites to do that. (And you’d also be way behind in Google search results.)

I recommend being as narrow and focused in your topic(s) as possible. Whether it’s RV travel, Turkey, Thailand, NYC, or your small town, the power of search lets everyone define their niche and still be able to reach millions of potential readers. In fact, being niche now is better than trying to be a more general resource site like mine.

Moreover, focusing lets you become an expert. You can be the person to whom readers always turn for information on this subject or that destination, which allows you to cultivate a bigger presence online.

Don’t try to be everything to everyone. Go narrow. Go deep.

5. Create Products

Businesses sell something — and so should you. Whether it’s a course, a book, t-shirts, tours, or just other people’s products via affiliate marketing, give your audience an opportunity to support your website. Offering products for sale allows you to be independent from sponsors and brand deals and not compete with other travel bloggers for spots on press trips (see below). It allows you to scale your website and your revenue. Many products offer value to your readers by going more in-depth and in detail than a blog post usually allows.

There are very few travel bloggers that produce products. Most of the time, travel bloggers end up making money by creating sponsored content and getting paid to go on trips. That’s cool if that is something you want to do, but that is time-consuming and requires you to be constantly working (and it’s soul-sucking). You never have time to relax or do something for yourself. It’s not a hamster wheel you want to be tied to.

Products allow you to create something once and earn revenue while sleeping, sightseeing, or getting a suntan on a beach! They give you ownership of your income and a chance for your readers to buy something from you and give back!

Trust me. Your readers want to support your hard effort. You just need to give them a way.

6. Don’t Take a Lot of Press Trips or “Work with Brands”

Why do people still buy guidebooks? Because they want an independent opinion on destinations. If everything you write is sponsored by someone, you’ll hit a limit to your number of readers. Sure, some people won’t care and will follow your adventures no matter what, but a larger majority of people will feel that you can’t relate to their experience and will seek to find information elsewhere.

Consumers want relatable and independent travel content because they want to learn that they can make it happen too. (Just look at the comments on this post if you don’t believe me!) If you’re in fashion, you can showcase all the makeup you want because a reader can look at that and think, “Yeah, I can do that too! To the mall I go!” But when you’re talking travel, people can’t look at your free, multi-thousand-dollar trip to the Maldives and say, “Yeah, that’s realistic for me too! To Expedia I go!”

Think about it. When you see someone having a $10,000 holiday, how do you feel? Do you think “Wow! That’s pretty!” or “Wow! I can do that too! I’m going to book that!?”

Sponsored trips, blog posts, and one off brand deals will help you travel and provide eye candy for your readers but it won’t create the expertise and relatable experiences that will have them coming back to you over and over for concrete advice or product purchases.

I’ve yet to see a pure travel blog get huge by only taking sponsored trips (though there are a number of fashion/travel hybrid blogs that are gigantic). The most successful bloggers in many niches avoid one-off partnerships and sponsored content because it dilutes their authenticity. (On the other hand, long-term partnerships are wonderful as they can bring value and unique deals to your readers.)

Avoid too many one-off trips paid by someone else, write about relatable experiences, and grow larger!

(And when you create products, you don’t need the money from these trips! Win-win!)

7. Network Outside of Travel

Networking with other travel bloggers can help you become better known in the industry (which is a good thing), but by reaching outside of the industry, you can be the travel person everyone else turns to for quotes, interviews, and advice.

And that is going to pay more dividends than just sticking to travel conferences. Yes, attend industry events (you’d be stupid not to!) but don’t attend only industry events.

Find where your expertise overlaps with other industries and meet the successful leaders in those industries. Then you can find people who know nothing about travel and be their travel expert on their websites. It’s how I’ve connected with so many finance, entrepreneurship, and tech experts. Here are some good conferences to attend:

8. Stop Talking About Yourself

While running a blog means you are going to say “I” a lot more than in magazine or newspaper writing, that doesn’t mean you should write only about yourself. If your blog is solely a journal or trip down memory lane, write about anything you want. But if you’re looking to run a professional blog that creates a sustainable business, remember that it’s not all about you.

It is – and always will be – about the people reading your website.

Whether that is by providing practical advice, telling them a good story, or making them laugh, remember that it’s all about how you can be in service to them.

If you are going to write about yourself, do so sparingly or relate it to the bigger picture of travel on the road. Don’t write about your new shoes, what food you ate, your thoughts on whatever, or the mundane details about your life. Few people really care about that. We read writers because they connect with us on an emotional level, tell good stories, and allow us to visualize ourselves in the places they talk about it.

Far too many travel blogs are a glorified personal diary but the most successful ones tell stories of places and better their reader’s travel experience!

9. Be Persistent

Rome wasn’t built in a day — and your blog won’t build itself overnight either. Maintain realistic expectations about your blog. Don’t expect anything but hard work for the first year. Don’t rush. Build something that will last. The light is always at the end of the tunnel, but too many people give up right before the end.

Go back to my early posts from 2008 — they are horrible. I mean god-awful. There is a big difference between the content I produced then and the content I produce now. Sucking — at first — is part of the journey. You aren’t going to be great out of the gate.

And a lot of bloggers, expecting instant fame and success, give up. I have tons of people go “Hey, can I get a refund on my course? I just don’t have the time right now. I’ll come back to it later.” They never do. I see it all the time. The reason most bloggers fail is not because they have bad content but because they give up. They don’t want to put in the time to succeed. Part of success is just outlasting everyone else.

Be patient. Put in the time. And you’ll reach your goals!

****
Creating a travel blog is a time-consuming process. Writing about your trip to Paris is only a small part of the story. Successful blogs focus on content and are customer-centered and reader-centered. It’s easy to reach small or mid-tier status but if you want to stand out, focus on reader-centric content, being niche, creating products, and sticking to best practices.

If you follow my nine times, I promise you’ll find success in the travel blogging industry. These are my nine guiding principles and they’ve served me well over the last decade!

Book Your Trip: Logistical Tips and Tricks

Book Your Flight
Find a cheap flight by using Skyscanner or Momondo. They are my two favorite search engines because they search websites and airlines around the globe so you always know no stone is left unturned.

Book Your Accommodation
You can book your hostel with Hostelworld as they have the largest inventory. If you want to stay somewhere other than a hostel, use Booking.com as they consistently return the cheapest rates for guesthouses and cheap hotels. I use them all the time.

Don’t Forget Travel Insurance
Travel insurance will protect you against illness, injury, theft, and cancellations. It’s comprehensive protection in case anything goes wrong. I never go on a trip without it as I’ve had to use it many times in the past. I’ve been using World Nomads for ten years. My favorite companies that offer the best service and value are:

Looking for the best companies to save money with?
Check out my resource page for the best companies to use when you travel! I list all the ones I use to save money when I travel – and that will save you time and money too!


P.S. – If you’re looking for more in-depth advice, I run a blogging course that gives you a behind the scenes look at how I run this website. You’ll get expert interviews, monthly webinars, FREE tech support and help with setting up your website, and one on one time with me! If you’re interested, click here to get started now.

The post 9 Ways to Become a Successful Travel Blogger appeared first on Nomadic Matt's Travel Site.
7 Editing Tips to Improve Your Travel Photographs

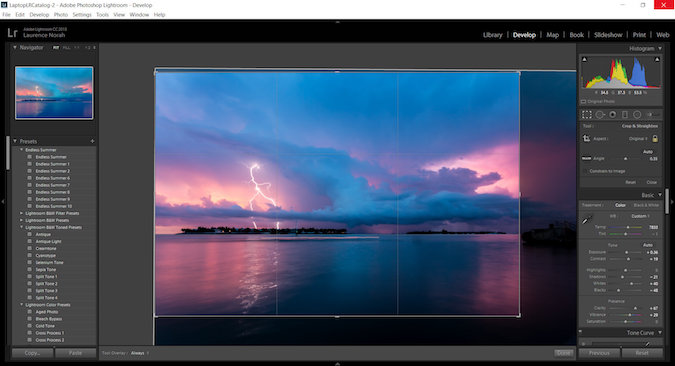
Blue pink photo of lightning at dusk
Updated: 12/09/2018 | December 9th, 2018

Today, professional photographer Laurence Norah of Finding the Universe, finishes his five-part series on taking better travel photos. In part five, Laurence is giving some simple post-processing techniques that you can use to make your travel photos wow your friends and family! Editing your photos is just as important as how you compose them, so I hope you’re ready to take some notes!

One of the most misunderstood parts of digital photography is what happens after you take the shot: editing your photos, aka post-processing. This is where you edit the images you have taken, to create the final product.

Post-processing is the equivalent of the darkroom from the days we shot in film.

In today’s post, we’re going to be covering some ideas for editing your photos, from the basics (cropping and leveling), through to more complicated actions like recovering shadow and highlight information.

Editing Photos: 7 Editing Tips for Your Travel Photos

1. How to Crop Your photos
The crop tool allows you to change the size of your image, and also to change the aspect ratio. For example, you can crop an image from a rectangular shape to a square shape. There are many reasons you would want to crop, including for publishing in different formats and aspect ratios.

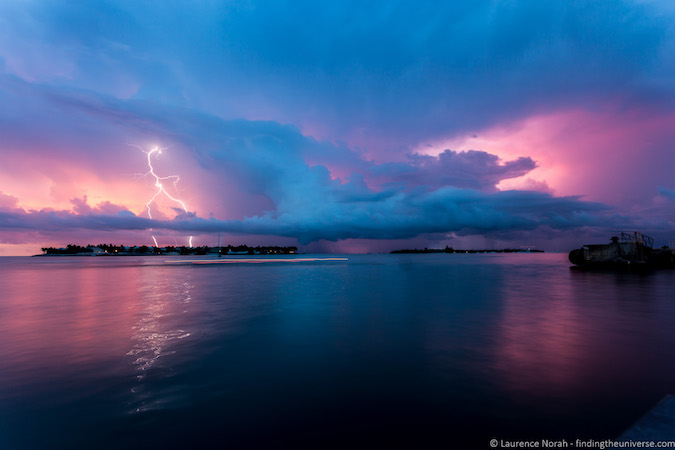
Let’s take a look at the first photo from this post, a lightning shot I took on a recent trip to the Florida Keys. Here’s the original version without cropping:

Blue dark pink nature photo of lightning at dusk

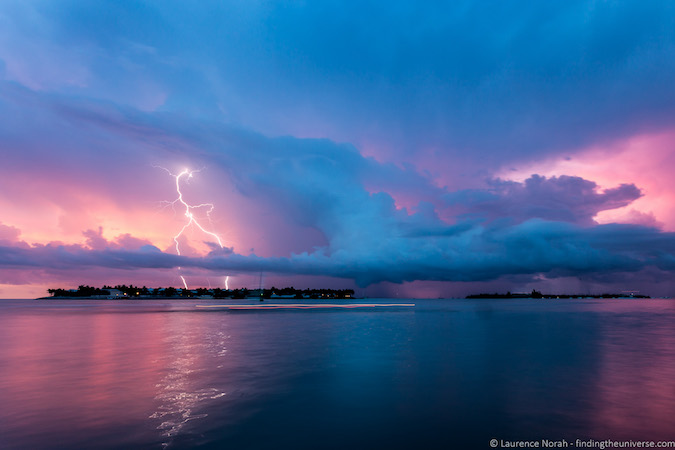
And the edited version, post-crop:

Blue pink photo of lightning cropped

Compared to the original, I have cropped the image to remove the dark part of the pier on the right-hand side of the image and recomposed using the rule of thirds, so I have one-third land and two-thirds sky. This makes the lightning bolt more the focus of the shot.

You might wonder why I didn’t just compose properly when taking the shot. Well, in this case, I was doing a long-exposure shot without a tripod, so had the camera balanced on the edge of the pier for stability. That very much limited my ability to perfectly frame the moment, so I just shot wider, knowing I’d be able to crop the shot appropriately after the fact.

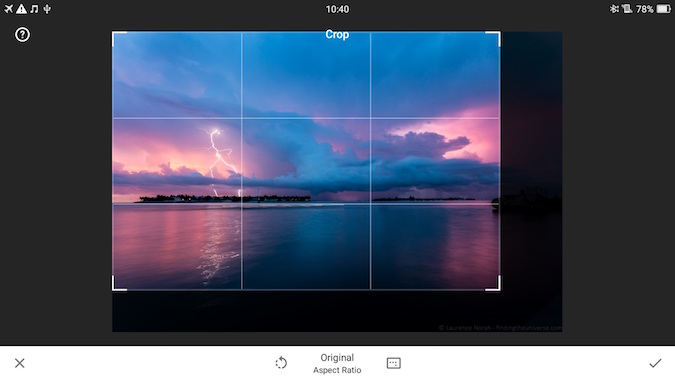
Let’s look at what cropping looks inside a couple of the tools available.

Here’s an example of cropping in Snapseed:

Blue pink nature photograph of lightning cropping mask Snapseed

And the same thing in Lightroom:

Blue dark pink photo of lightning lightroom cropping mask Lightroom

In both cases, cropping is very simple: it just involves you selecting the crop tool and then selecting the area you want to keep with your mouse or finger. Then you apply the changes, and voilà, your new cropped image is ready to go.

As you see from this and later examples, the tools look similar across different platforms, so it’s easy to apply the learning you have from one tool to another.

2. How to Level Your Travel Photos
One of my personal petty annoyances in photography is when the horizon line in a photo isn’t level. Sometimes when we’re caught up in the moment, this basic compositional rule is forgotten — but the good news is that editing your photos to make them level is also very easy.

I’ll use the lightning shot as my example again. Balancing the camera on the edge of the pier meant that the shot wasn’t level — this is particularly noticeable to the eye when the image has a clearly defined horizon line, such as the sea.

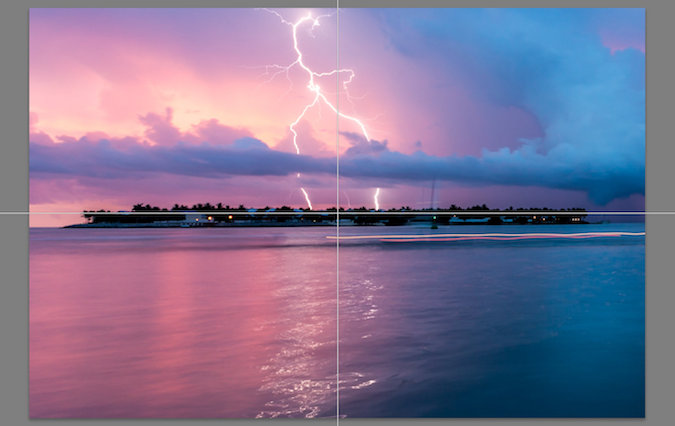
If we look at a zoomed in version of the image in its original form, with a line overlaid near the horizon, we can see that it’s not level — the line is closer to the horizon on the right-hand side than the left.

Blue pink nature picture of lightning at dusk leveling mask

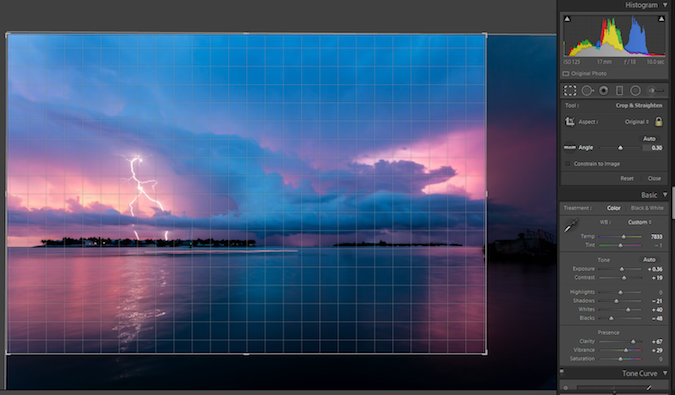
In Lightroom, the level tool is part of the crop tool, and you can just rotate the image to suit. When you use the level tool, a grid will appear to help you get the alignment correct. Here’s a screenshot of that in action in Lightroom.

Blue pink nature photo of lightning straightening mask Lightroom

And here’s the same procedure in Snapseed, where the level tool is called “Rotate”:

Blue pink nature photo of lightning rotate feature snapseed

Leveling an image is a really simple task that will take just a few seconds of your time, resulting in a much more visually pleasing image.

3. Vignetting Your Photos
Vignetting is about making parts of the image darker or lighter than other parts, in order to make it clearer what the subject of the shot is.

Some tools restrict your vignette to the corners, but in applications like Snapseed and Lightroom you can selectively darken and lighten areas of the image — you don’t need to restrict yourself to the corners.

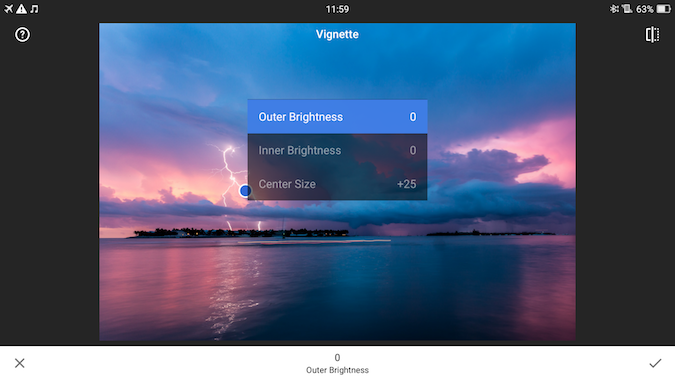
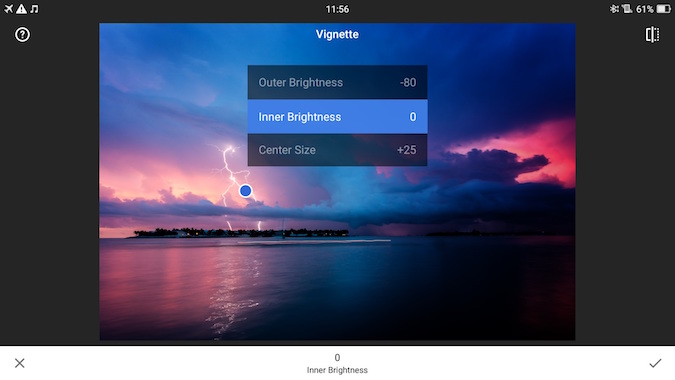
Taking the lightning shot above, let’s load up the vignette tool in Snapseed.

Blue pink nature photo of lightning outer brightness vignette

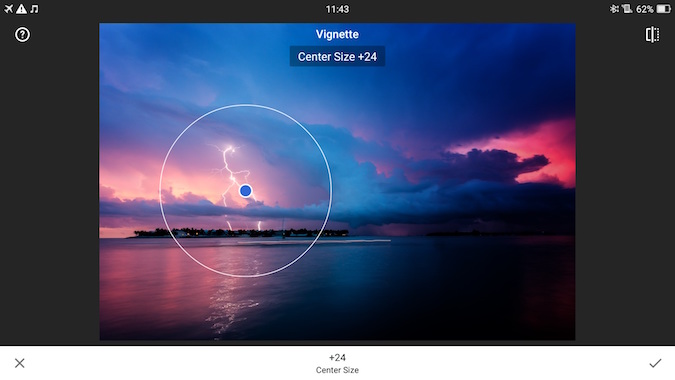
Here we have options for how big to make the “center size,” i.e., the area to be edited. Inside this area, everything can be made brighter (inner brightness) and everything outside the area can be made darker (outer brightness). We can also do it in reverse, making the inner darker and the outer brighter.

Let’s apply the vignette tool to the lightning bolt, to give you an idea of the effect:

Blue pink nature photo of lightning inner brightness vignette

Above are the settings I chose for outer brightness and inner brightness, while below is the size of the vignette itself, which is based on the center size setting.

Blue pink nature photo of lightning vignette center point

Vignetting is particularly good for portraits, and anywhere where you really want to make the subject of the image more clearly obvious to the viewer.

4. How Change Shadows and Highlights in Your Photos
Sometimes when we take a photograph, parts of the shot might end up being darker or brighter than we want. We refer to the dark areas of the shot as shadows, and the bright areas of the shot as highlights.

We can fix this by changing the brightness of the shadow and highlight areas specifically, using either the “Shadow” or “Highlight” tool. This is a tool that works particularly well on RAW files as they retain more information on the shadow and highlight areas of an image compared to a compressed JPG, which discards most of this information in order to save file size.

Let’s take a quick look at adjusting shadows and highlights using Lightroom. In Snapseed, shadow and highlight adjustment can be found under the “Tune Image” setting.

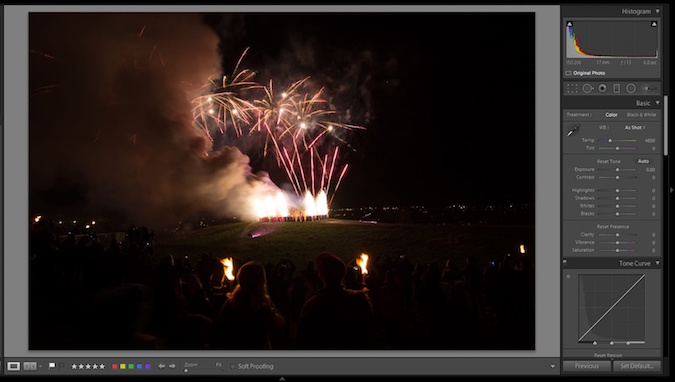
Here’s a shot of a couple enjoying a bonfire and fireworks display in Edinburgh during Hogmanay:

Contrast tutorial with fireworks at hogmanay in Lightroom - before

As you can see, the fireworks and bonfire are clearly visible, as are the torches the couple is holding, but the rest of the shot is dark. Let’s adjust the settings and see what we can get.

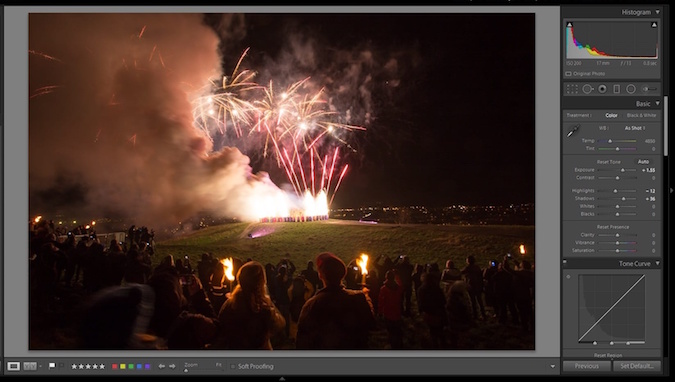
Contrast tutorial with fireworks at hogmanay in Lightroom - after

In this version of the image, the couple is much more visible, as is the hill the fireworks are on and the surrounding crowd.

To achieve this I increased the overall exposure of the image, making the whole image brighter, including the shadows and the highlights.

Then, as the shadow areas were still a little dark, I increased those a little more.

Finally, as the global exposure adjustment made the fireworks and bonfire too bright, I reduced the highlights a little bit to give the final result.

Shadow and highlight adjustment is useful in a wide range of scenarios to help balance the image out — bringing overexposed areas down in brightness, and helping to boost the shadows. Just be aware that a light touch is recommended — increasing the brightness of the shadows too much can result in a lot of noise being revealed, which might look unnaturally green or purple.

5. How to Adjust the Contrast
Contrast is about accentuating the difference between the light and dark parts of the image. Increasing the contrast of an image can dramatically improve the visual impact that has, by making the boundaries between those light and dark parts clearer.

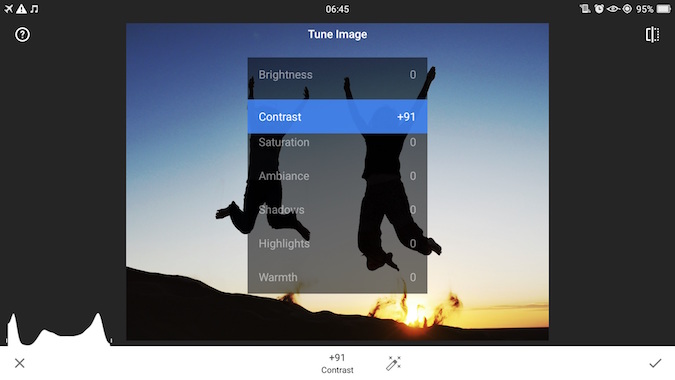
Let’s take a look at a shot of people jumping against the sunset in the Sahara, for example, which I’ll be editing in Snapseed.

Girls jumping on sand dunes - original photo

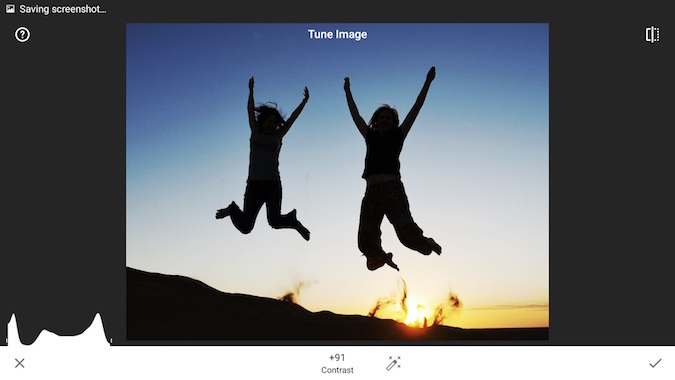
There is nothing too wrong with this shot, but it lacks the visual impact that I wanted. Ideally, I would want the shapes of the people to be in full silhouette against the sun, but as it was shot the camera picked up some skin tones and clothing color.

Using the contrast tool, we can make the dark areas stand out against the bright areas.

Girls jumping on sand dunes - contract tutorial photo

And here’s the result:

Girls jumping on sand dunes - after photo

As you can see, this made the jumping figures and the dune more silhouetted against the sky. In most shots, you only want to tweak the contrast a little bit to get the desired effect, normally no more than +20 or so, but in this case, the higher number gave the best result.

6. How to Adjust Colors
Color adjustment is another important piece of the editing toolkit. We can adjust image color in all sorts of ways, from changing the overall “warmth” of the image (how blue or yellow it appears), to individually changing the hue and saturation of specific colors inside an image.

For this post, though, I just want to cover some very simple color changes you can use to make your images just a little more visually impactful.

The fastest way to adjust an image’s color is with the “Saturation” tool. This changes the appearance of every color in an image to make it more or less saturated. We can use the saturation tool to desaturate an image, eventually resulting in a black-and-white image with no color:

Photo of orange building and waterfall - black and white - desaturated

Or we can go all the way to the other end of the spectrum, and make the color incredibly saturated:

Photo of orange building and waterfall - neon - saturated

As with many edits, the key is to find a good balance — oversaturated images tend to look rather unnatural. Desaturated images can be very effective, and of course black-and-white is an excellent choice for all sorts of situations, in particular, portraits, architecture, and certain landscape scenes. But generally you would want to find a happy midpoint: not too oversaturated and not too undersaturated.

Photo of orante building and waterfall - normal

Saturation is adjusted on a sliding scale and is on the basic adjustments panel in Lightroom or the “Tune Image” option in Snapseed.

7. Blemish correction
The last area I’m going to touch on today is blemish correction, or “image healing.” Sometimes there will be something in an image that you really don’t want to be there, like an inconvenient pimple on someone’s face. This is easy to remove in all the major editing tools.

You can, in theory, remove any object from a scene, but the healing tool works best on distinct, small objects that are surrounded by uniform colors. This is because the heal tool has to replace the area you wish to remove with something else, and this works best when it has an area nearby that looks similar. So for example, a pimple on a face is surrounded by a lot of similarly colored skin, so the heal tool can easily calculate what to replace the pimple with based on the surrounding area.

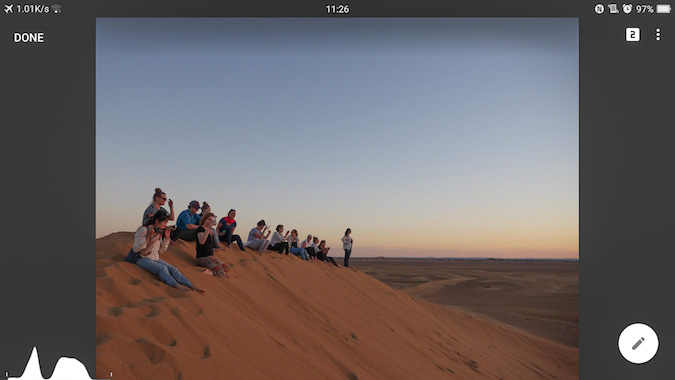
For this example, I’m going to show how Snapseed can be used to replace an object in a scene. Here’s a group of people sitting on a sand dune in the Sahara:

People sitting on a sand dune in Lightroom 1

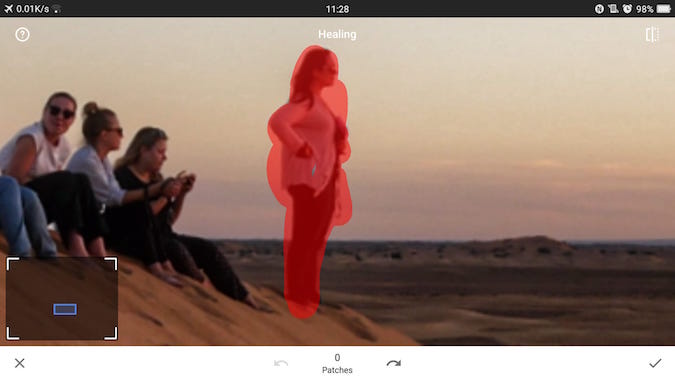
Let’s say for some reason I only wanted to have people sitting in my shot, and I need to remove the standing person. She is a good candidate for removal as she is separate from the rest, and the surrounding scenery is not too complicated.

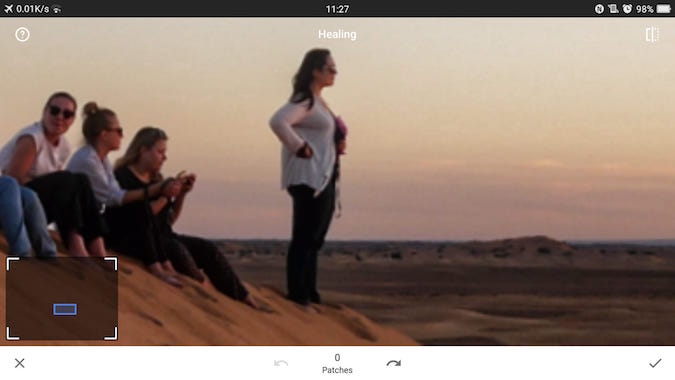
In Snapseed, we load up the healing tool, then we zoom in on the object to be removed with the standard “pinch to zoom” gesture.

People sitting on a sand dune in Lightroom 2

Next, we use our finger to draw the area to be removed. It’s important to be as precise as possible because the tool is most accurate with small objects.

People sitting on a sand dune in Lightroom 3

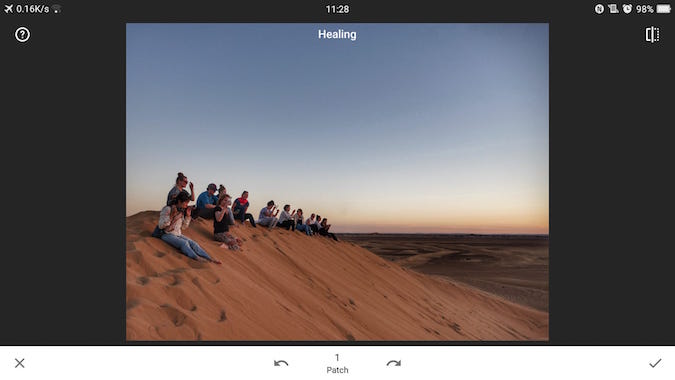
Once we have drawn the area, Snapseed will edit it out, replacing it with the best guess of what is behind the object.

People sitting on a sand dune in Lightroom 4

As you can see, the result is impressive, with no real evidence that there was anyone standing there at all.

The healing tool is perfect for all manner of fixes, from editing out unwanted background strangers in your shot, to removing skin blemishes in portraits or power lines in landscape shots.

Best Photography Editing Software

Here is a list of the best editing tools out there:

  • Adobe Lightroom (PC or Mac)Lightroom is the industry standard tool for photography professionals. But this post is not going to focus on Lightroom, nor cover everything you can do in Lightroom, as it’s a massively complex tool, covering both photo management and photo editing.
  • iPhoto (Mac) – I list iPhoto here mainly because it’s a commonly used tool among Apple users. However, I personally never recommend using it. While it will let you do everything that I cover in this post and is better than nothing, the way it manages your photos makes it hard to migrate to a more sophisticated system further down the line if you choose to do so.
  • Picasa (PC or Mac)Picasa is a free desktop photo editing application from Google. It’s very simple, but it allows you to do everything I’m going to cover in today’s post. If Lightroom is a bit overwhelming, Picasa is a great, free place to start.
  • Snapseed (iOS or Android) – Another free Google tool, Snapseed is the best mobile image-editing app for both iOS and Android. It’s an incredibly powerful tool that, while simple to start using, has a great many features that take time to fully master. I use it for 95% of my mobile editing needs.

Let’s take a look now at what you can and should be using these tools for with your images.

***

Editing your photos is a crucial step that far too many people skip. As you can see from this lesson, there is much more to editing your photos than just picking a filter and posting your picture on Instagram. By incorporating some of these tips and techniques into your post-processing routine you’ll be able to improve your travel photography in leaps and bounds.

So get out there and start taking pictures!

Laurence started his journey in June 2009 after quitting the corporate life and looking for a change of scenery. His blog, Finding the Universe, catalogs his experiences and is a wonderful resource for photography advice! You can also find him on FacebookInstagram, and Twitter.

Travel Photography: Learn More Tips

For more helpful travel photography tips, be sure to check out the rest of Laurence’s travel photography series:

LEARN TO GET OUT OF AUTO!

capture the world photography courseIf you are looking to really get into photography and want to master your camera and take amazing photos when you travel, Laurence and I have developed a comprehensive photography course that will get you out of auto and have your friends go “Wow! That’s really breathtaking!” in no time. Click here to learn more about the course and start today!

Book Your Trip: Logistical Tips and Tricks

Book Your Flight
Find a cheap flight by using Skyscanner or Momondo. They are my two favorite search engines because they search websites and airlines around the globe so you always know no stone is left unturned.

Book Your Accommodation
You can book your hostel with Hostelworld. If you want to stay elsewhere, use Booking.com as they consistently return the cheapest rates for guesthouses and cheap hotels. I use them all the time.

Don’t Forget Travel Insurance
Travel insurance will protect you against illness, injury, theft, and cancellations. It’s comprehensive protection in case anything goes wrong. I never go on a trip without it as I’ve had to use it many times in the past. I’ve been using World Nomads for ten years. My favorite companies that offer the best service and value are:

Looking for the best companies to save money with?
Check out my resource page for the best companies to use when you travel! I list all the ones I use to save money when I travel – and I think will help you too!

The post 7 Editing Tips to Improve Your Travel Photographs appeared first on Nomadic Matt's Travel Site.
The Ultimate 2018 Holiday Gift Guide for Travelers

a camera in christmas lights
Posted: 12/3/18 | December 3rd, 2018

Travelers can be a fickle group of people to buy gifts for as we’re constantly coming and going. We usually don’t carry a lot of stuff with us, and no two travelers are alike so finding the perfect gift for the traveler in your life can be tricky.

While a plane ticket is never a bad idea (I’m a window seat in case anyone is thinking of getting me one), I’ve put together this ultimate (and our first ever) holiday gift guide for travelers as there’s a lot of great travel gear out there these days that helps people travel cheaper and better.

Even me, the gear adverse traveler, likes a lot of this stuff!

This is stuff I actually think is super useful. No nonsense. No fluff.

Just the best gifts for intrepid travelers and globetrotting nomads.

Traveler Gift Guide Table of Contents

  1. Travel Gear
  2. Travel Tech
  3. Travel Inspiration

Best Holiday Gifts for Travelers!

Travel Gear

1. My Favorite Travel Backpack
REI Flash travel backpackIf you’ve got a budget traveler on your holiday list, a travel backpack is the gift that keeps on giving. A well-made bag will last for years and through dozens of adventures. Having a reliable travel backpack is one of the most important items for a traveler. My favorite bag is the Flash 45 from REI but other great companies worth checking out are Osprey, Nomatic, and MEC (for Canadians).

—> Buy it now from REI!

(For a different backpack, check out my guide finding the right backpack for more options!)

2. Packing Cubes
travel packing cubesPacking cubes are an awesome tool to help you stay organized while you travel. Whether you’re a budget backpacker or traveling with half a dozen suitcases, packing cubes will keep you organized as you travel the world. They come in a variety of sizes, allowing you to store items big and small. If you know a traveler who needs a hand staying organized, this is the gift for them!

—> Buy them now on Amazon!

3. Travel Padlock
Master travel padlockThis simple item is one of the most important for the budget traveler. Since many hostels have lockers, backpackers need to have their own lock when they’re on the road. While you can usually rent them at hostels, those prices add up after a while. I never leave home without a lock because I never know when it will come in handy.
—> Buy it now on Amazon!

4. Travel Clothing from Unbound Merino
Unbound Merino wool shirtThese travel clothes are some of the most versatile on the market. Made from merino wool, Unbound’s clothing can be worn daily for weeks (and months!) without getting smelly. They are perfect for the traveler who wants to pack lighter. I really love the material, they feel great, they hardly ever need a wash, and they last forever!

—> Buy them now on Unbound!

5. Suavs shoes
suavs shoesThese shoes are super versatile and durable, making them great for traveling. Whether you’re just exploring the city or in need something that looks a bit fancier, these shoes can do it all so you don’t have to pack multiple shoes. They are flexible, light, washable, and breathable. I love them! (They look great too!)

—> Buy a pair now on Amazon!

6. Eco-friendly Luggage from Samsonite
samsonite recycled eco-friendly travel luggageIf you’re in need of proper luggage, Samsonite has been a go-to brand for durable, reliable luggage for ages. Now, I’m a backpack guy but I love this new luggage set. It’s made from 100% recycled plastic! Every little part of it! I can get behind something that environmentally friendly. It also comes with a limited 10 year warranty too in case something goes wrong.

—> Buy it now on Amazon!

7. Earplugs
travel ear plugsAnyone who has ever stayed in a hostel knows that a good pair of earplugs is a necessity. From chronic snorers to late-night drinkers to copulating couples in creaking bunks, hostels are known for their less-than-quiet accommodation. Add some earplugs to your shopping list. Because the gift of a good sleep is priceless!

—> Buy it now on Amazon!

8. Sea to Summit Quick Dry Travel Towel
sea to summit travel towelHaving a lightweight, quick-drying towel makes a huge difference when you’re on the road. Big, bulky towels take up a lot of space in your backpack and they take a long time to dry. If you’re on the road, you don’t want a towel to delay your plans or stink up your bag. Enter the travel towel. It’s the compact, quick-drying solution that every backpacker needs.

—> Buy one now on Amazon!

9. Travel Headlamp
travel head lampThis is a great tool for both backpackers and anyone looking to do any hiking or camping. In a hostel, they’re helpful if you need to check in or out but don’t want to disturb your fellow travelers. For outdoorsy folks, they’re useful for hiking, setting up camp in the dark, and for emergencies.

—> Buy one now on Amazon!

10. LifeStraw
lifestraw water filterEnvironmentally, pollution from single-use plastics is something every traveler has witnessed. And, monetarily, when you’re traveling, continuiously buying water gets expensive. Do your part to help the planet by traveling with a reusable filter. LifeStraw is an awesome brand with a built in water filter. The filters last 5 years so you save money on changing them too.

—> Buy one now on Amazon!

11. Travel Neck Pillow
a comfortable travel pillowTravel pillows are perfect for those long-haul flights, delayed buses, and airport naps. Every traveler needs to have a travel pillow on hand to maxamize that downtime and time in transit. They’re great for helping prevent jetlag and make even the longest, most uncomfortable trip a little more bearable.

—> Buy it now on Amazon!

Travel Tech

12. MacBook Air
MacBook air laptopThis is my favorite travel computer. It’s light, it’s powerful enough for regular use, and the battery life is great. While an iPad might be another potential travel choice, I find the Air much more versatile. You can do a lot more with it. When I’m on the road, this is the laptop I travel with.

—> Buy one now on Amazon!

13. iPhone
iPhone XWhile not a cheap phone, the iPhone X has such a good camera that you don’t need to take a traditonal camera with you when you travel. It has a solid battery life, a grat lens, beautiful screen, and, is overall, just awesome. True, I’m an Apple fanboy so I might be biased but hey, it’s my list!

—> Buy it now on Amazon!

14. Wireless Noise-Canceling Headphones
Bose QC35 headphonesThese are great for those long flights or bus trips as they block out background noise so you can read, work, or sleep without being distrubed. The wireless Bose QuietComfort 35 headphones are fan favorites and my go-to brand. They are comfortable, rechargable, and do an amazing job at removing background noise. If you’re on a budget, consider the QuietComfort 25 instead.

—> Buy one now on Amazon!

15. Mophie External Battery
mophie external batteryThese days, we all travel with numerous electronic devices like phones and tablets. It can be hard to keep them all charged. This solves that problem. Two high-output USB ports make this external battery incredibly convenient, and it can charge up to 100 hours of battery in one go.

—> Buy one now on Amazon!

16. Kindle
a kindle from AmazonWhile I personally prefer to read physical books, I can’t argue against the convenience and simplicity of the Kindle. Hauling around physical books is a pain if you’re traveling often. With a Kindle, you can pack hundreds of books into a single device, and many versions can also use apps and access the internet. It’s a great gift for the avid reader.

—> Buy it now on Amazon!

17. Travel Adapter
travel adapterNothing is more tedious than arrving to a new destination only to realize you can’t charge your devices because the electrical outlets are different. Enter the travel adapter. They’re a simple accessory. There’s a million out there but this is one I use. I like that is also has USB outlets on it too.

—> Buy it now on Amazon!

18. GoPro Hero 7 Black
gopro hero 7Every traveler needs a camera, and few are as versatile and durable as the GoPro. They’re great for photos and video no matter the climate. They’re waterproof and are perfect for both everyday city exploring as well as more extreme and adventurous activities. They’re just awesome.

—> Buy it now on Amazon!

Travel Inspiration

19. Scratch Travel Maps from Landmass
travel scratch mapThese maps are a fun way to keep track of your past travels while helping you stay inspired as you plan your future trips. You simply scratch off the parts of the world you’ve been. Simple. Easy. Landmass is my favorite company that makes these, though there are plenty of other companies that make them now, so you can also find them in all sorts of sizes and colors.

—> Buy one now on Amazon!

20. Hand-drawn Food Maps
hand drawn food maps from legal NomadsThese are unique, hand-drawn typographic maps of food from Legal Nomads and artist Ella Frances Sanders. They make a great gift for anyone who loves to eat and travel (and who doesn’t!). They come in a variety of sizes too! Jodi’s maps are the best!

—> Buy it now! (Use the code SEALUP for 15% off!)

21. The Fearless Guide to Solo Female Travel
Solo female travel guidebookKristin Addis created this detailed guide to solo feamle travel, addressing all the concerns women have about traveling. The book includes tons of tips and advice, as well as interviews with other female travelers and writers. It gives you the specific, actionable information you need to conquer the world on any trip!

—> Buy it now!

22. Moleskine Notebook
moleskine travel notebookI never leave home without one of these. They are the perfect notebook for journaling during your trip as well as for writing down travel notes such as directions, contact information, and language tips. I think everyone needs to write more during their travels so they have something to look back on (other than photos).

—> Buy one now on Amazon!

23. Travel Books
The Alchemist book coverFew things can inspire you to travel like a great book. They can transport you to new places and keep your wanderlust stoked while you work towards making your own travel dreams a reality. If you’ve got an avid reader who loves to travel on your holiday list (or if you’re just looking for something to read over the holidays) one of my favorite travel books might be a great holiday choice!

—> Here’s a list of great books to get!

24. Celiac Travel Cards
Legal Nomads celiac logoMy friend Jodi from Legal Nomads created these helpful travel cards for anyone traveling with Celiac disease. They are in-depth resources that communicate your concerns to restaurant staff in a way that allows anyone traveling with the disease to have a worry-free meal. If you or someone you love has Celiac disease, these travel cards are a great resource!

—> Buy them now! (Use the code SEALUP for 15% off!)

25. How to Travel the World on $50 a Day
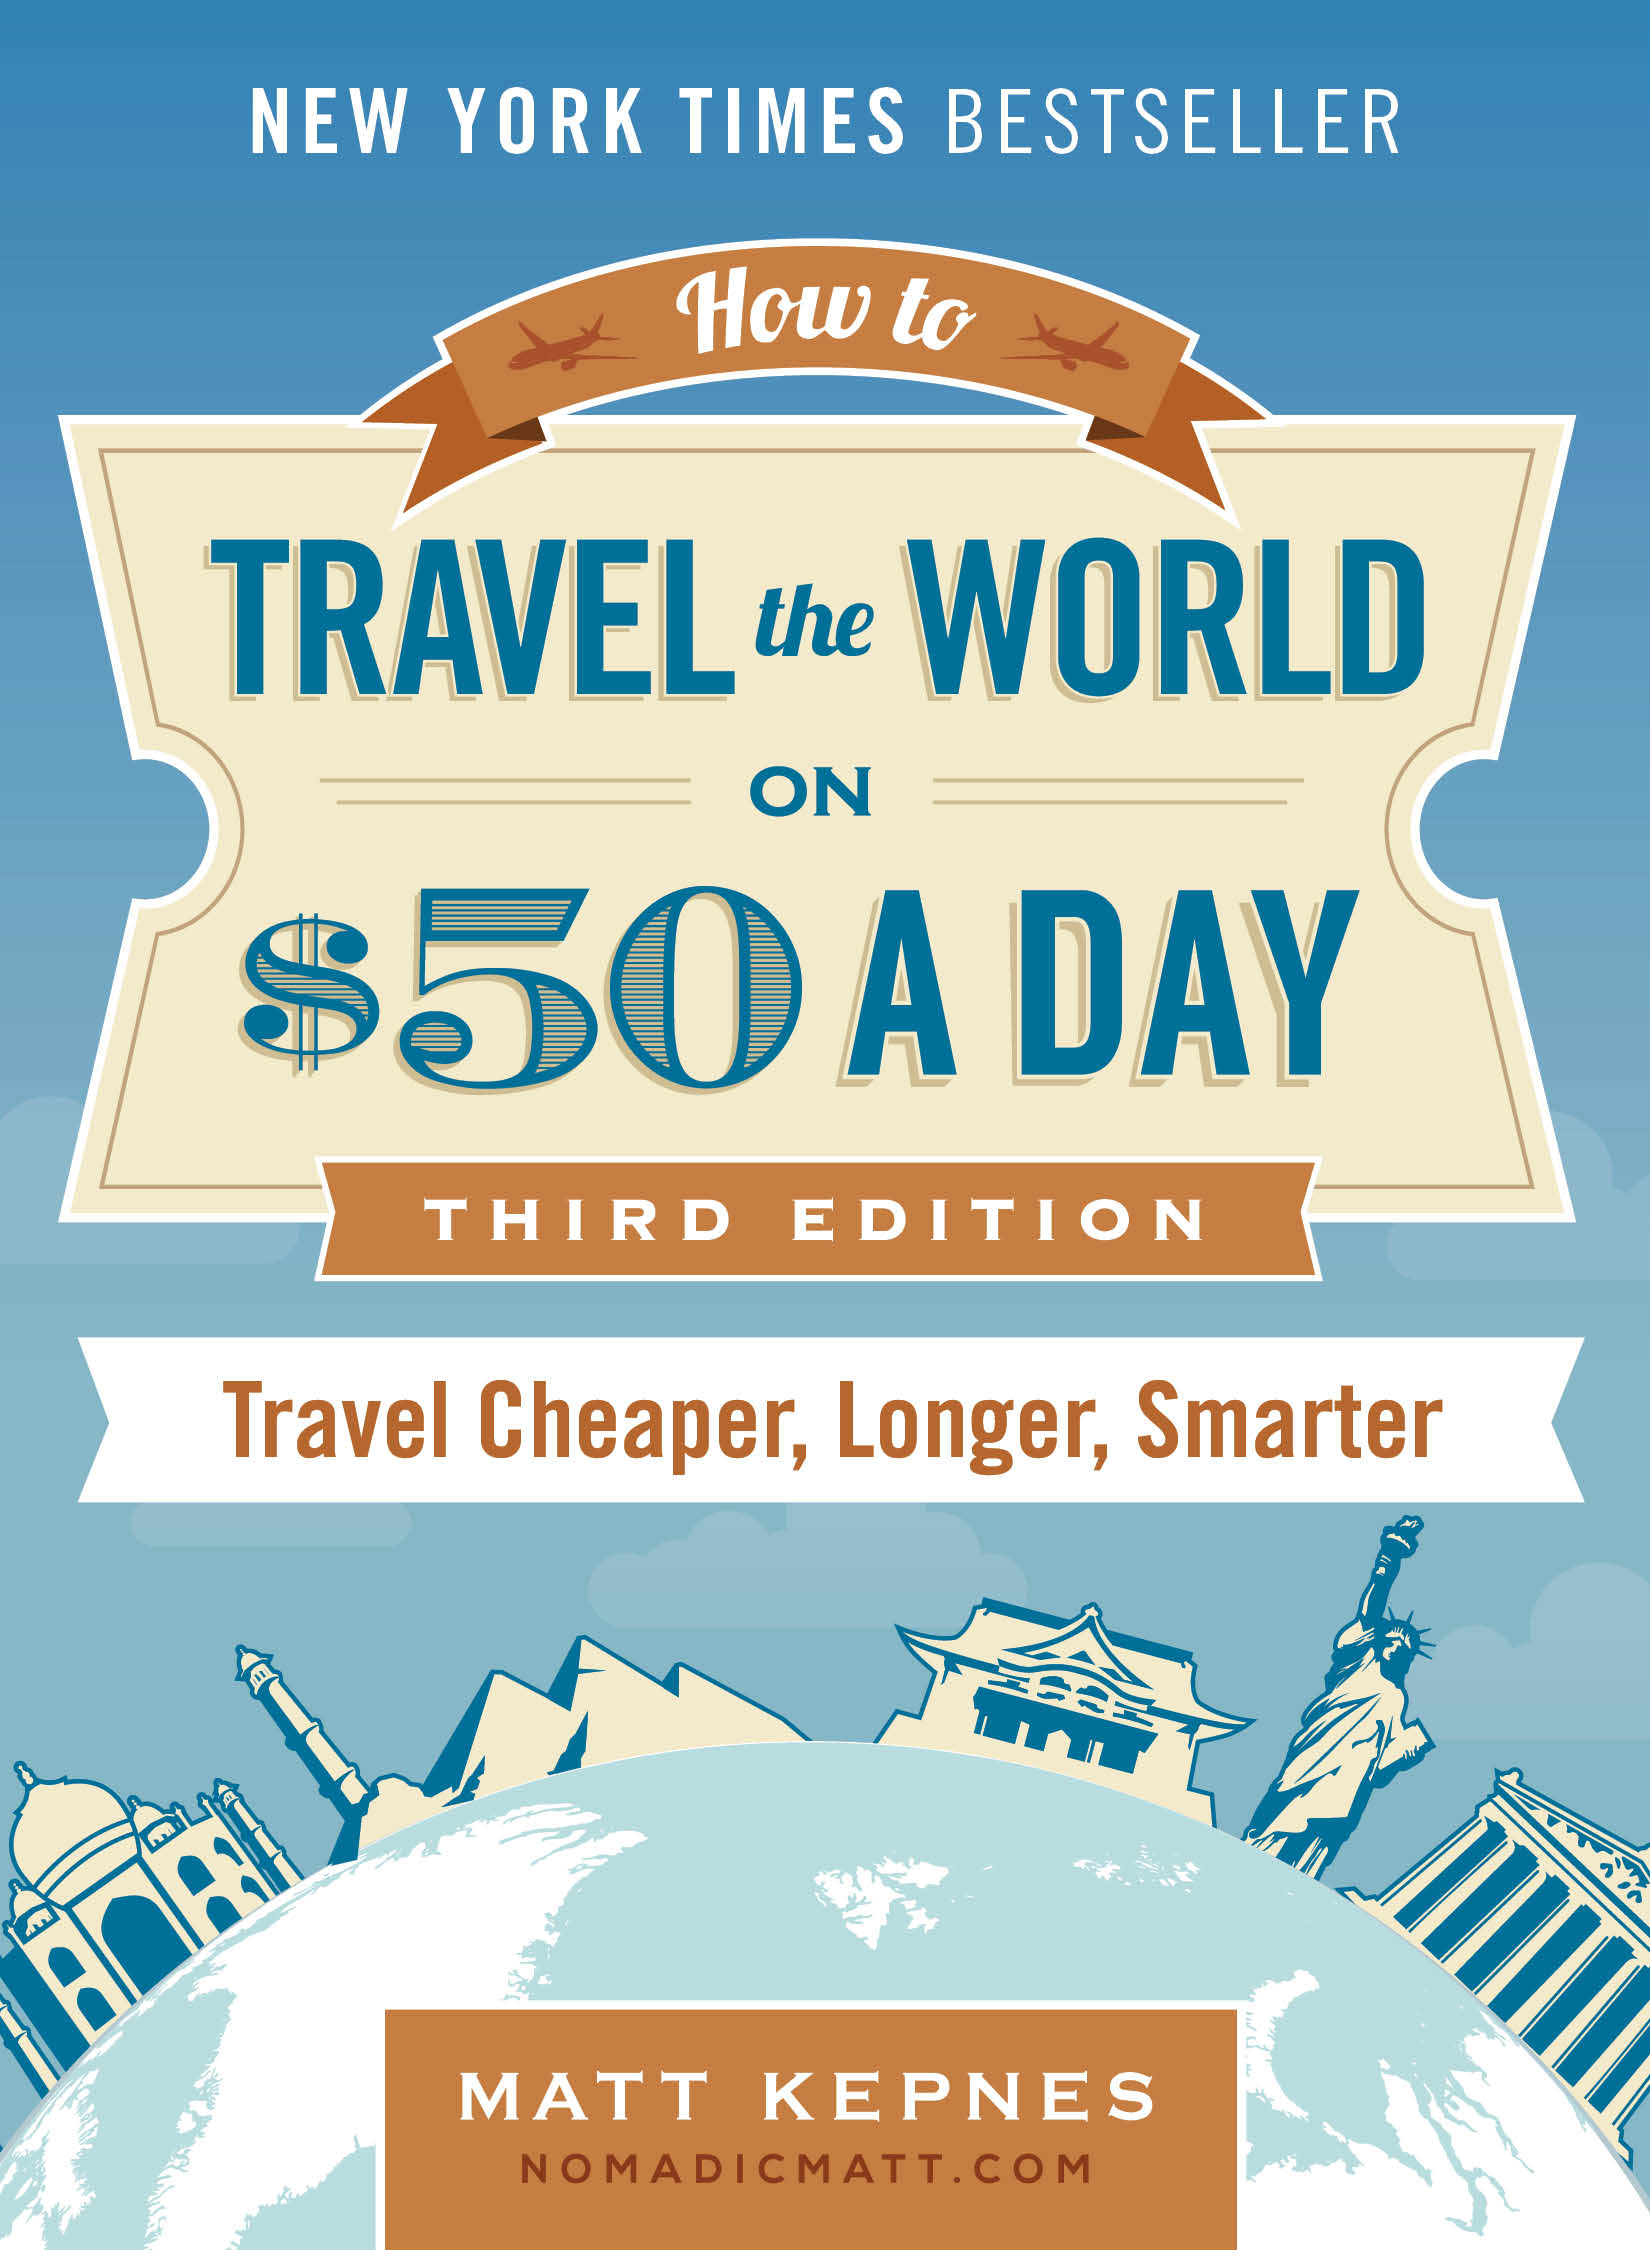
$50 a day by Matt KepnesWhile I might be biased, I think this is a travel resource that every traveler needs in their arsenal! It will show you how I travel the world on a budget, illuminating all my best tips in one easy to follow format that you can take with you when you travel. It will show you how to become a master traveler and navigate the world — no matter where in the world you want to go!

—> Buy it now on Amazon

26. Donate to Charity!
flyte charity logoFor the traveler in your life who has everything, why not make a donation to charity on their behalf! FLYTE is an awesome charity that I started back in 2015 to help high school students in underserved communities experience the transformational power of travel. Every year we send a new group of students abroad, but we can’t do it without your help!

—> Donate and some kids learn the gift of travel today!

***

Whether you’re searching for the perfect holiday gift for a traveler in your life or just looking for some holiday inspiration for yourself, this list will help you find an awesome gift for the holidays. No matter your budget, there is something here for you that will help you level up your travels or the travels of a loved one.

The post The Ultimate 2018 Holiday Gift Guide for Travelers appeared first on Nomadic Matt's Travel Site.